Data2Model User Guide
About Data2Model
Data2Model is a software as a service solution that allows the automatic generation of ArchiMate models from various data sources. Its intent is to enable a repeatable, automated workflow for people who would normally create models by hand, such as enterprise architects, information architects or business analysts. Data2Model integrates with the Models4Insight platform and repository for version management and model persistence.
This guide is intended to help you get started with Data2Model quickly. It describes the basic steps to turn data into a model, as well as the capabilities of the Data2Model tool.
Registration
If you are not already a Models4Insight user, you will need to register first. To do so, please visit www.models4insight.com and click the register button.
Clicking the register button takes you to the user registration page where you are asked to provide some personal information. Note: A username cannot use capital letters, special characters or double spaces.
Once you have filled in all the information, click on register. You will receive a verification email at the address you provided. You need to verify your registration before you can log in.
You should immediately receive an email from Aurelius Enterprise. The link within is valid for 5 minutes. Check your spam folder if you cannot find the email. If 5 minutes have passed, please click the re-send email button.
Login
All Models4Insight services use a single sign-on. This means you only need to log in once to use all services. If you are not already logged in, you will be prompted to do so when you initially visit Data2Model.
Installation
If you are a mobile user, or if you are using Chrome, you have the option to install Data2Model as an app on your device. This will add a shortcut to your home screen or desktop, and will allow Data2Model to run as a dedicated app/window. You will find the installation button in the navigation menu.
It is recommended that you install the app if you intend to use Data2Model regularly. You will not miss out on any functionality if you do not install or if you are using a different browser.
Workflow
The basic workflow for Data2Model is as follows:
- Choose a dataset and upload it for parsing
- Review the parsed dataset
- Define model extraction rules
- Extract a model from the data based on the rules defined
- Review the model
- If you like the generated model, commit it to the repository. If not, adjust the rules and try again.
Upload some data
The first step in generating a model is to choose the dataset you want to base the model on. Depending on the structure of your dataset, you may need to do some data preparation outside of Data2Model first. Data2Model supports datasets in the following formats:
- XLS
- XLSX
- CSV
- A list of flat JSON objects
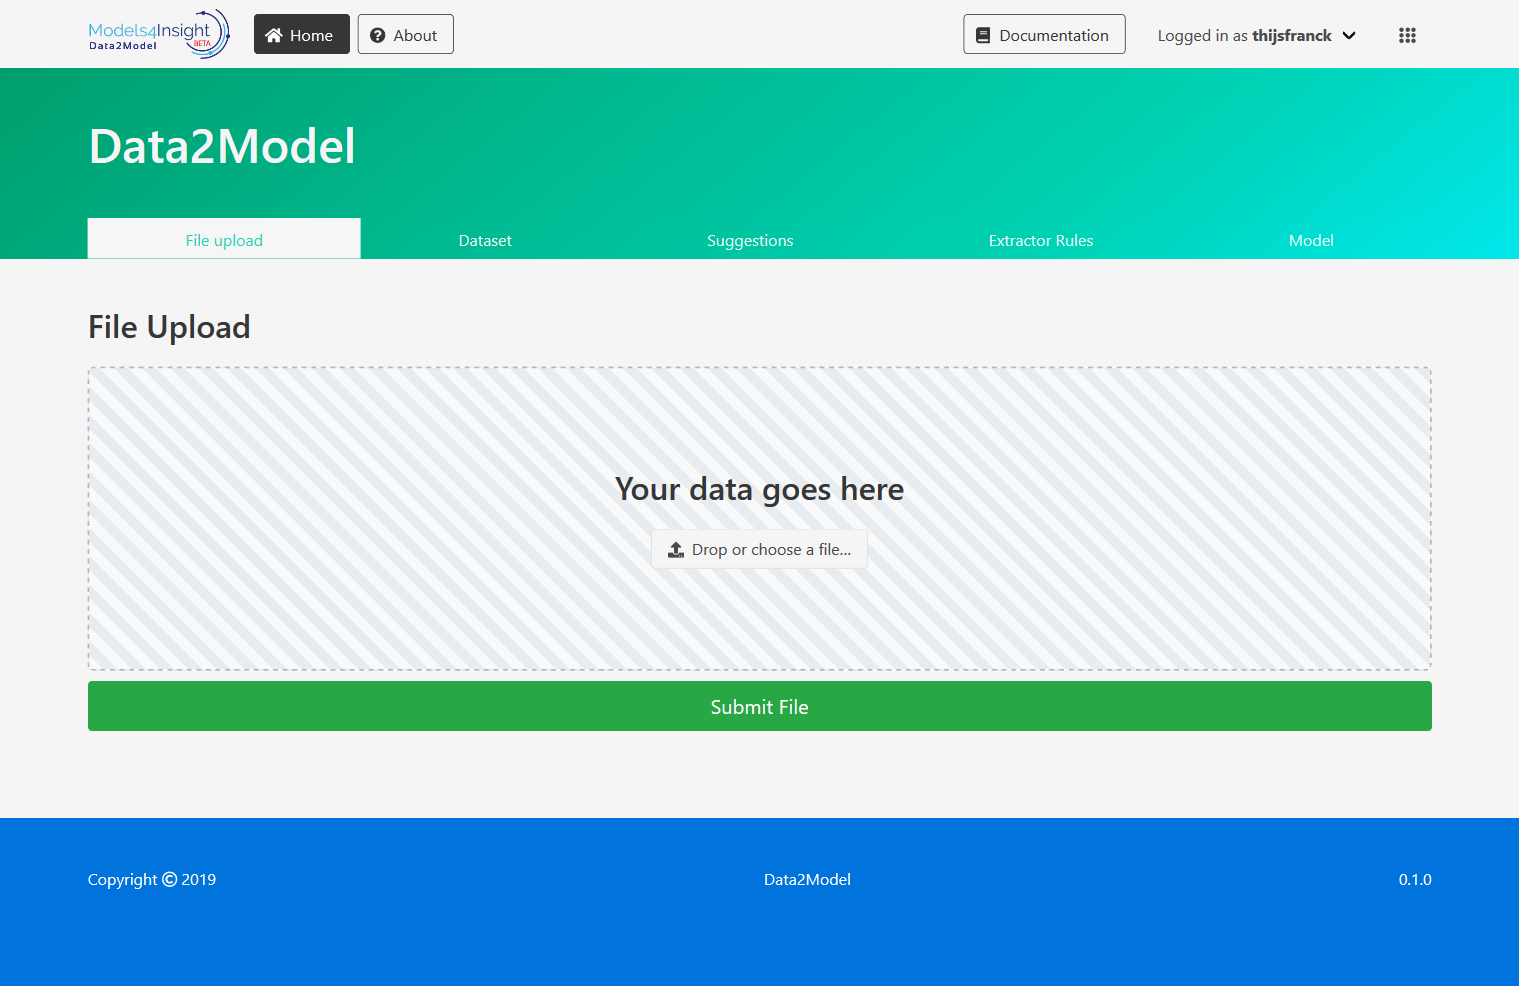
When you first open Data2Model, you will be presented with a file upload page. Here you can provide your dataset as a file. You can either drop the file into the striped area, or you can click the ‘Choose a file’ button to browse for the file.
Once you have selected the file, click the ‘Submit File’ button. This will upload your file to the Data2Model server for processing. A progress bar will pop up to indicate that the server is still busy. When processing is completed, you will be moved on to the next step.
Review the data
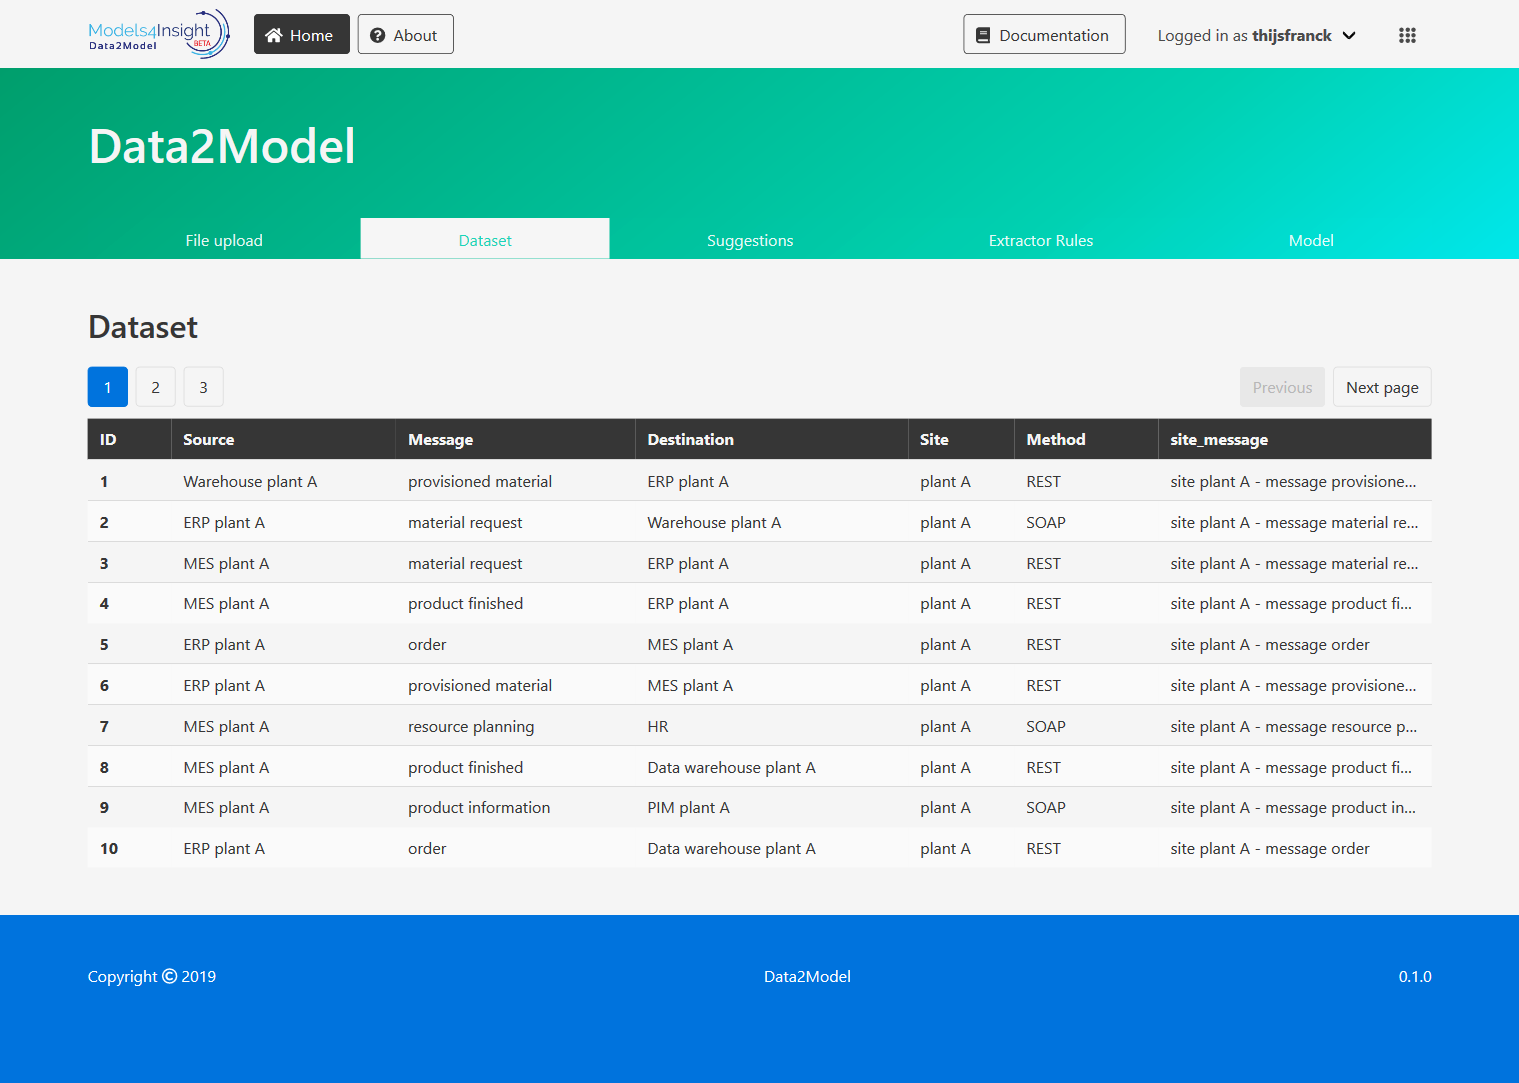
Next, you will be shown the result of the data processing. The page contains a table, where each row should mirror a row/object in your original dataset. The data shown here is the data from which a model will be extracted. Please check whether the processed data matches your expectations. When you’re done, please move on to the next step.
Define extraction rules
Data2Model uses rules to define which elements, relationships and views it should extract from your dataset. This rule-based approach provides a couple of key benefits:
- A relatively small set of rules can be applied to generate a complex model from a large dataset.
- Rules enable an incremental modelling workflow, where you tweak the rules to improve the quality of the model.
- Rules can reflect your organization’s modelling conventions, and they can be used to uniformly apply these conventions.
- Rules can serve as provenance of model concepts and views.
- Rules can be reused in case of e.g. a time-series dataset that is updated over time.
- Rules can be shared with colleagues.
Since every dataset is different, we ask that you define these rules yourself. There are 2 primary ways of defining rules in Data2Model:
- Easy mode: Define rules from suggested relationships based on the structure of your dataset. This approach provides more guidance and creates extractor rules automatically.
- Expert mode: Define rules completely manually using the rule editor. This approach gives you more control at the cost of more complexity.
The next chapters explain each approach in more detail.
Building a model in easy mode
To get started building a model in Easy mode, please navigate to the suggestions tab.
When you open the suggestions tab, you will be presented with a set of suggested relationships grouped per ArchiMate relationship class, these being:
- Dynamic relationships: Relationships which describe temporal dependencies between elements within the architecture.
- Structural relationships: Relationships which represent the static coherence within an architecture. These include composition, aggregation, assignment and realization.
- Other relationships: Relationships which do not fall into either of the above categories. This includes dependency relationships and composite relationships.
You can switch between suggestions for the given relationship classes using the respective tabs on top of the suggestions table.
For every suggested relationship, the names of the columns representing the source and target elements are given. To get started defining rules for a relationship, click its respective row in the table.
When selecting a suggestion, the associated element, relation and view rules are generated automatically.
After selecting a suggestion, the model builder and model preview appear below the suggestions table.
The model builder allows you to customize the generated rules. You can select a type for the source and target elements, as well as for the relationship itself. Note that if there already exists an element rule which corresponds to the same column as the source or target columns, the type of the element will be inherited from this rule.
If you want to turn around the relationship to point from target to source, rather than from source to target, you can click the green button next to the relationship type field. You can also select a name for your relationship, which will appear as a text above the arrows, if your dataset contains suitable values.
Finally, you can customize the views that will be generated for the relationship. You have the option to:
- Group views by source column,
- Group views by target column, or
- Add all generated elements and relations into a single view
Whenever you change an aspect of your rules, the model preview will update to show you what the resulting model would look like based on a small subset of your data.
Building a model in expert mode
To get started building a model in Expert mode, please navigate to the rules tab.
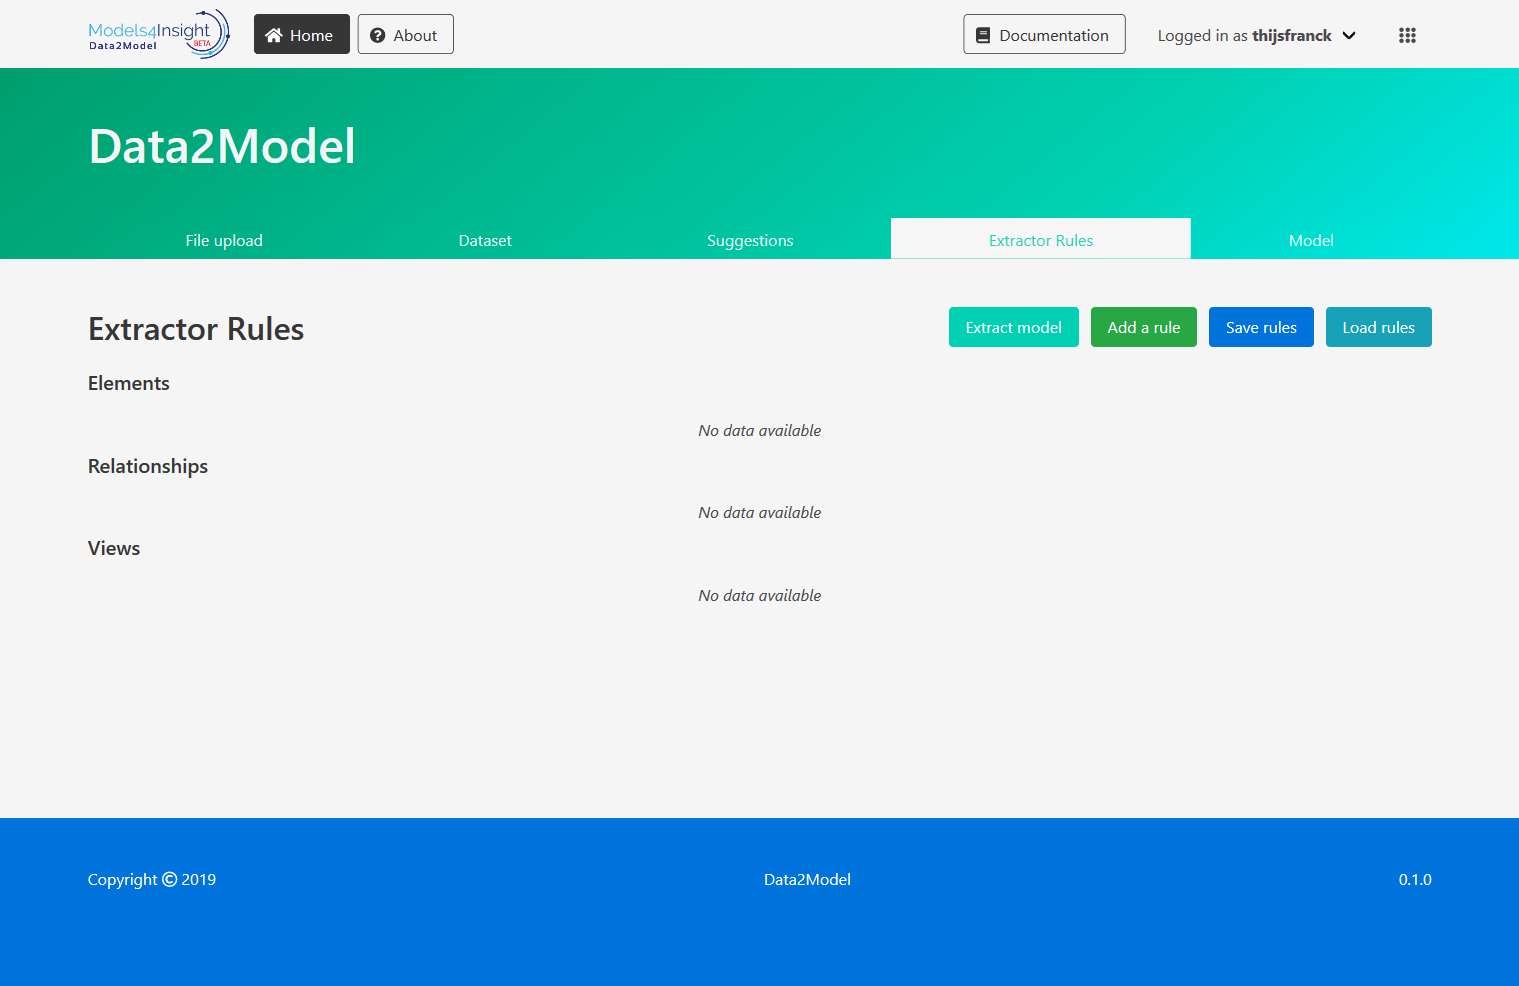
The rules overview presents your current ruleset categorized by elements, relationships and views.
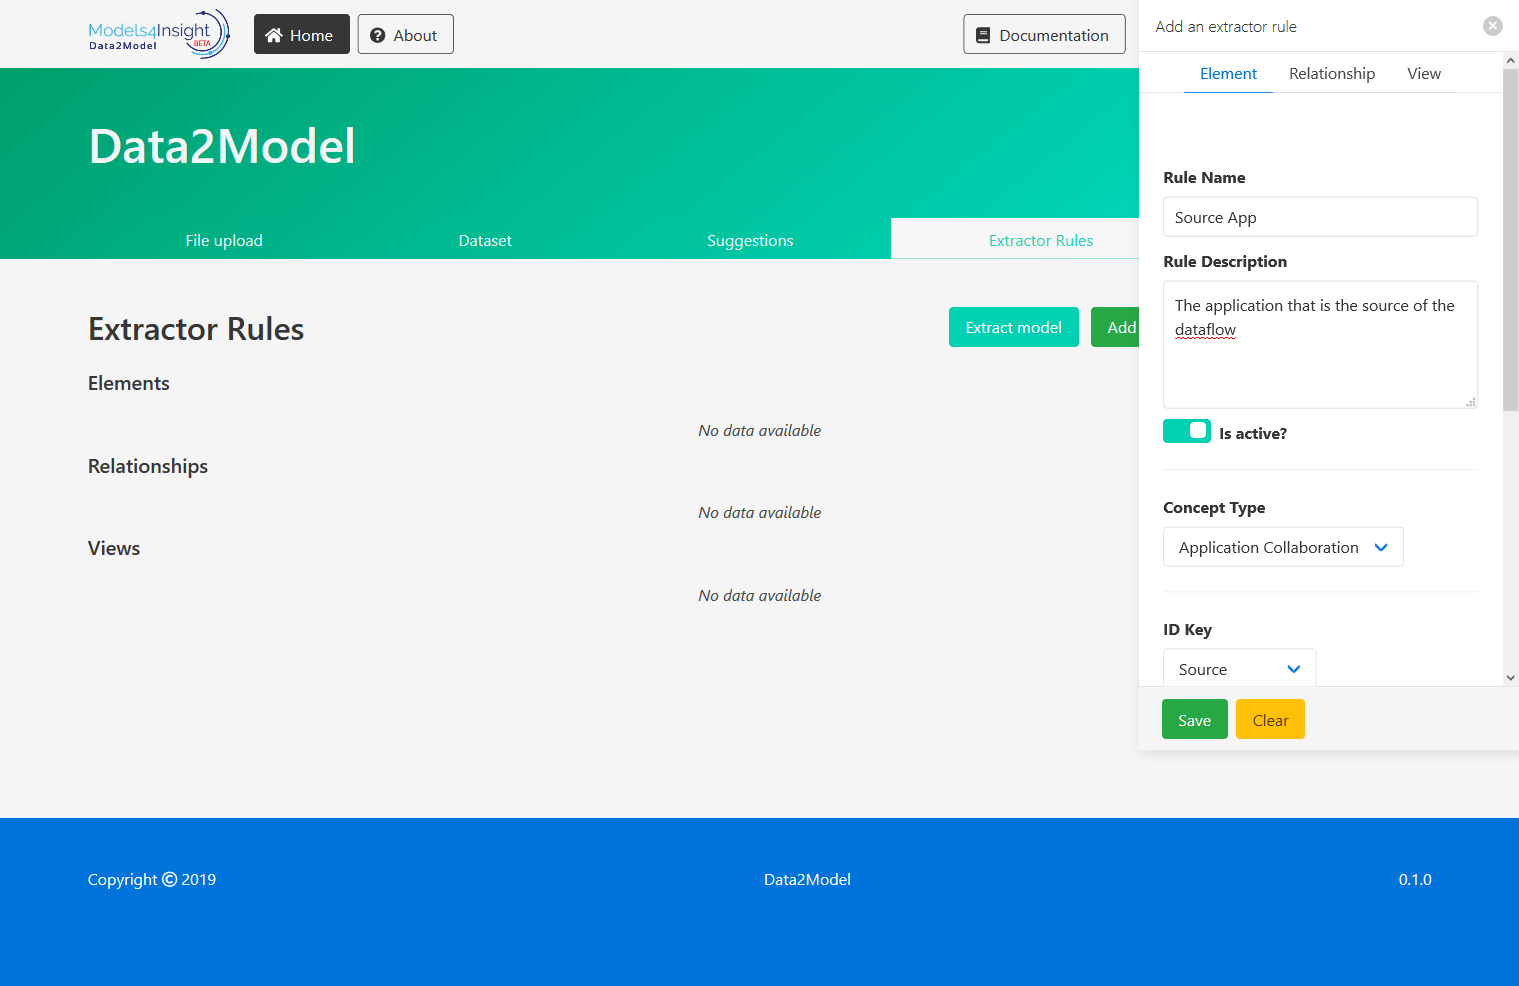
To add a new extractor rule, click the ‘add a rule’ button at the top of the overview. This will open a side window, where you can define rules for elements, relationships and views. If you need to reference your dataset while defining the rule, you can switch back and forth to the data overview while the rule definition screen stays open.
For elements, the following configurations are available:
| Field | Description |
|---|---|
| Rule Name* | A descriptive name for the rule |
| Rule Description | A short description of the intention of the rule |
| Is Active* | Whether or not the rule is currently enabled for the extractor |
| ID Key | The name of the column that uniquely identifies this element |
| ID Prefix | A namespace for when the same ID is shared between multiple elements |
| Name Key* | The name of the column that contains the name of this element |
| Name Prefix | A namespace that is added in front of the element name |
| Attribute Mapping | Columns that should be added as attributes to the element |
For relationships, the following configurations are available:
| Field | Description |
|---|---|
| Rule Name* | A descriptive name for the rule |
| Rule Description | A short description of the intention of the rule |
| Is Active* | Whether or not the rule is currently enabled for the extractor |
| ID Key | The name of the column that uniquely identifies this relationship |
| ID Prefix | A namespace for when the same ID is shared between multiple relationships |
| Source Element* | The rule which defines the source of this relationship |
| Target Element* | The rule which defines the target of this relationship |
| Name Key* | The name of the column that contains the name of this relationship |
| Name Prefix | A namespace that is added in front of the relationship name |
| Attribute Mapping | Columns that should be added as attributes to the relationship |
Finally, for views, the following configurations are available:
| Field | Description |
|---|---|
| Rule Name* | A descriptive name for the rule |
| Rule Description | A short description of the intention of the rule |
| Is Active* | Whether or not the rule is currently enabled for the extractor |
| ID Key* | The name of the column that uniquely identifies this view |
| ID Prefix | A namespace for when the same ID is shared between multiple views |
| Name Key* | The name of the column that contains the name of this view |
| Name Prefix | A namespace that is added in front of the view name |
| Path | Where the view should be placed in the folder structure of the model |
| Layout* | The type of layout that should be applied to the view |
| Attribute Mapping | Columns that should be added as attributes to the view |
| Elements | The rules which define the elements that should be added to this view |
| Relationships | The rules which define the relationships that should be added to this view |
* = required
When you’re done defining a rule, press the ‘save’ button at the bottom of the rule definition screen. This empties out the form and adds a new rule to rules overview. If you just want to clear out the form without saving the rule, hit the ‘clear’ button instead.
To edit an existing rule, or to simply view its details, click any rule in the rules overview. This will open the rule definition screen for the selected rule. You can now make changes to this rule, use this rule as the basis for a new rule, or delete the selected rule. To overwrite an existing rule with your changes, press the ‘save’ button. To save a new rule based on your changes, press the ‘save as’ button. To delete a rule, press and hold the ‘delete’ button for 1 second.
When you have created multiple rules, it could be that some rules conflict with others. If this is the case, the rules overview will indicate this with an icon next to the conflicting rules. When you hover over the icon, there will be an indication of what is going on. Some conflicts will prevent you from extracting a model until you have resolved them.
We recommend saving your rules when you are done defining them. To do so, press the ‘save rules’ buttons at the top of the rules overview. This brings up a window where you can give your ruleset a name. Hit the ‘save rules’ button at the bottom of this window to download a file containing all the rules you have defined.
To load a set of rules you previously saved, press the ‘load rules’ button at the top of the rules overview. This brings up a file explorer window which you can use to locate your ruleset.
When you are satisfied with your current set of rules, and the rules are not conflicting with each other, you can press the ‘extract model’ button to extract a model from the dataset based on the rules you have defined. This sends your rules and data to our server, where a model will be generated. This might take a while depending on the complexity of the model. A progress bar will indicate the current status. Once the extraction is completed, you will be moved to the final screen.
Review the model
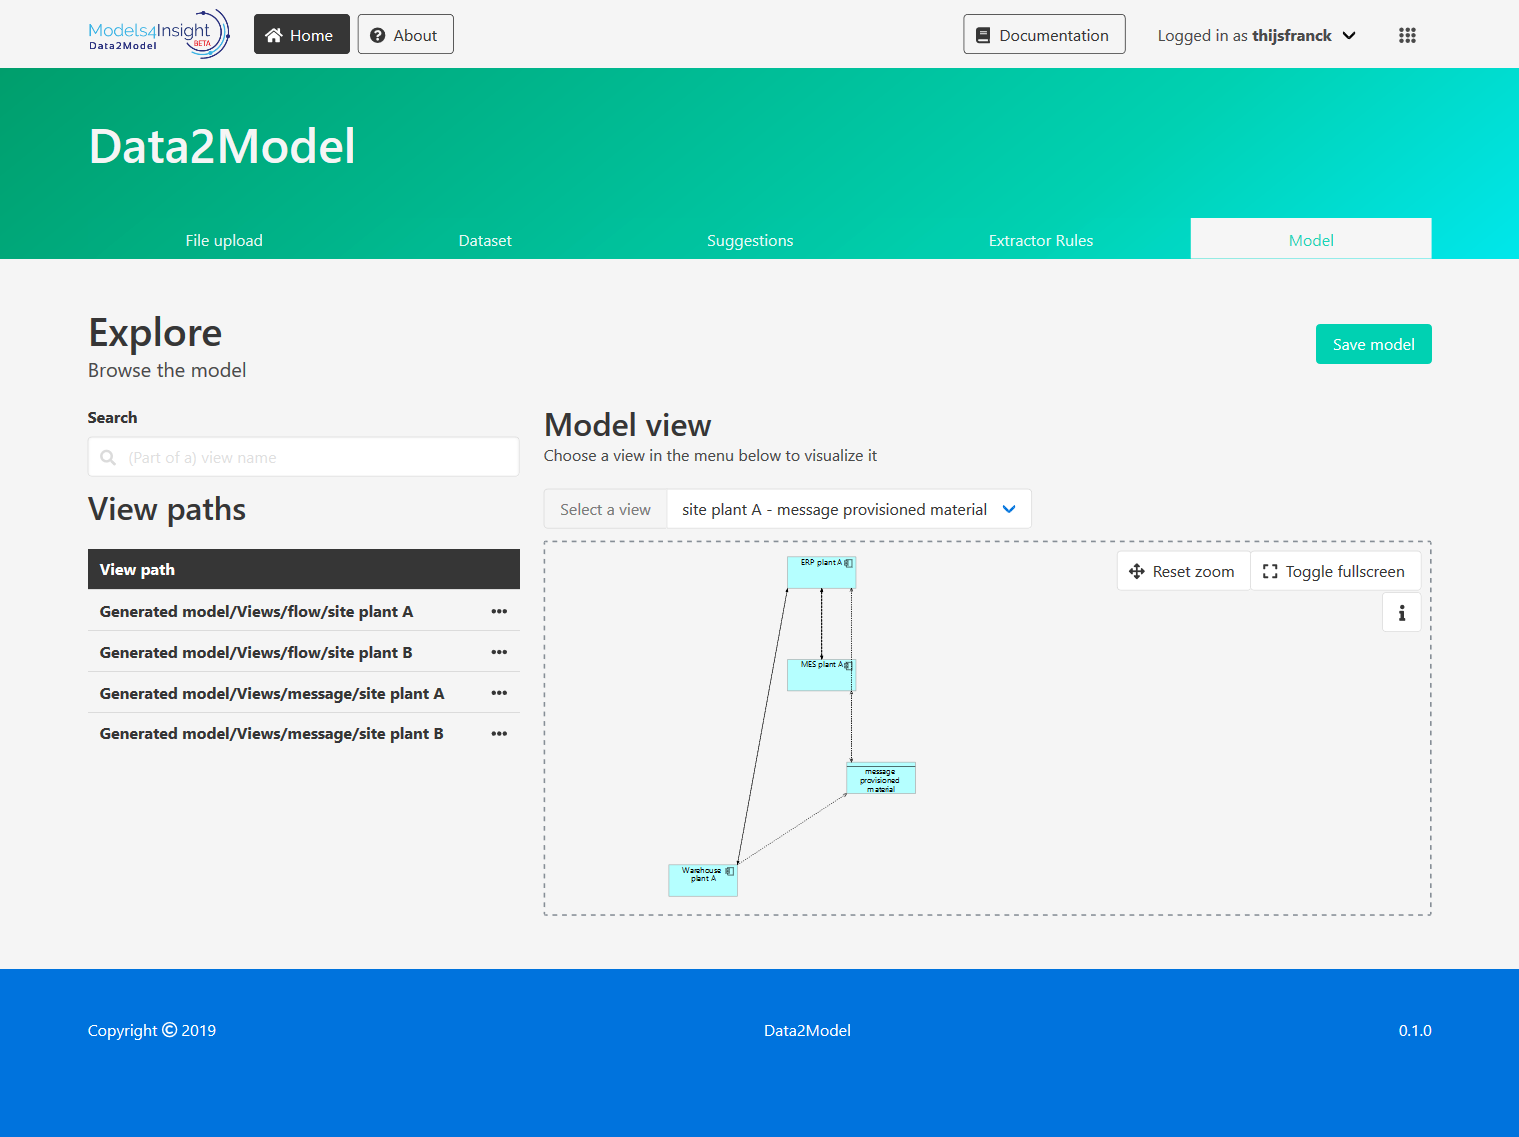
When model extraction is complete, you can review the generated model in the model explorer. Here you can see all the views that have been generated by the extractor.
Model view
In the dropdown at the top of the page, you can choose which view you would like to display. After selecting a view, it will become visible in the area below. You can zoom and pan the view. You can reset the view to its original position by clicking the reset zoom button. When you click a concept, its associated data will be shown. Additionally, you can toggle the full screen button to hide the other elements of the explorer.
Concept data
Whenever you click on a concept in the model, the concept data section shows its associated data. The selected concept receives green outline. To unselect, press the concept again. You can also select the relations. If no data is available for the selected concept, a ‘no data’ message is displayed instead.
Filter
You can use the filter to the left of the model view to find a specific view you may be looking for. This narrows down the list of views in the dropdown menu. You have the option of searching for a view by name. You can also use the organization structure of the model itself to narrow down your selection further.
After reviewing the model, you can either choose to commit the model to the repository if you are satisfied with it, or to alter the rules and extract another model to improve the quality of the extraction result.
Saving the model
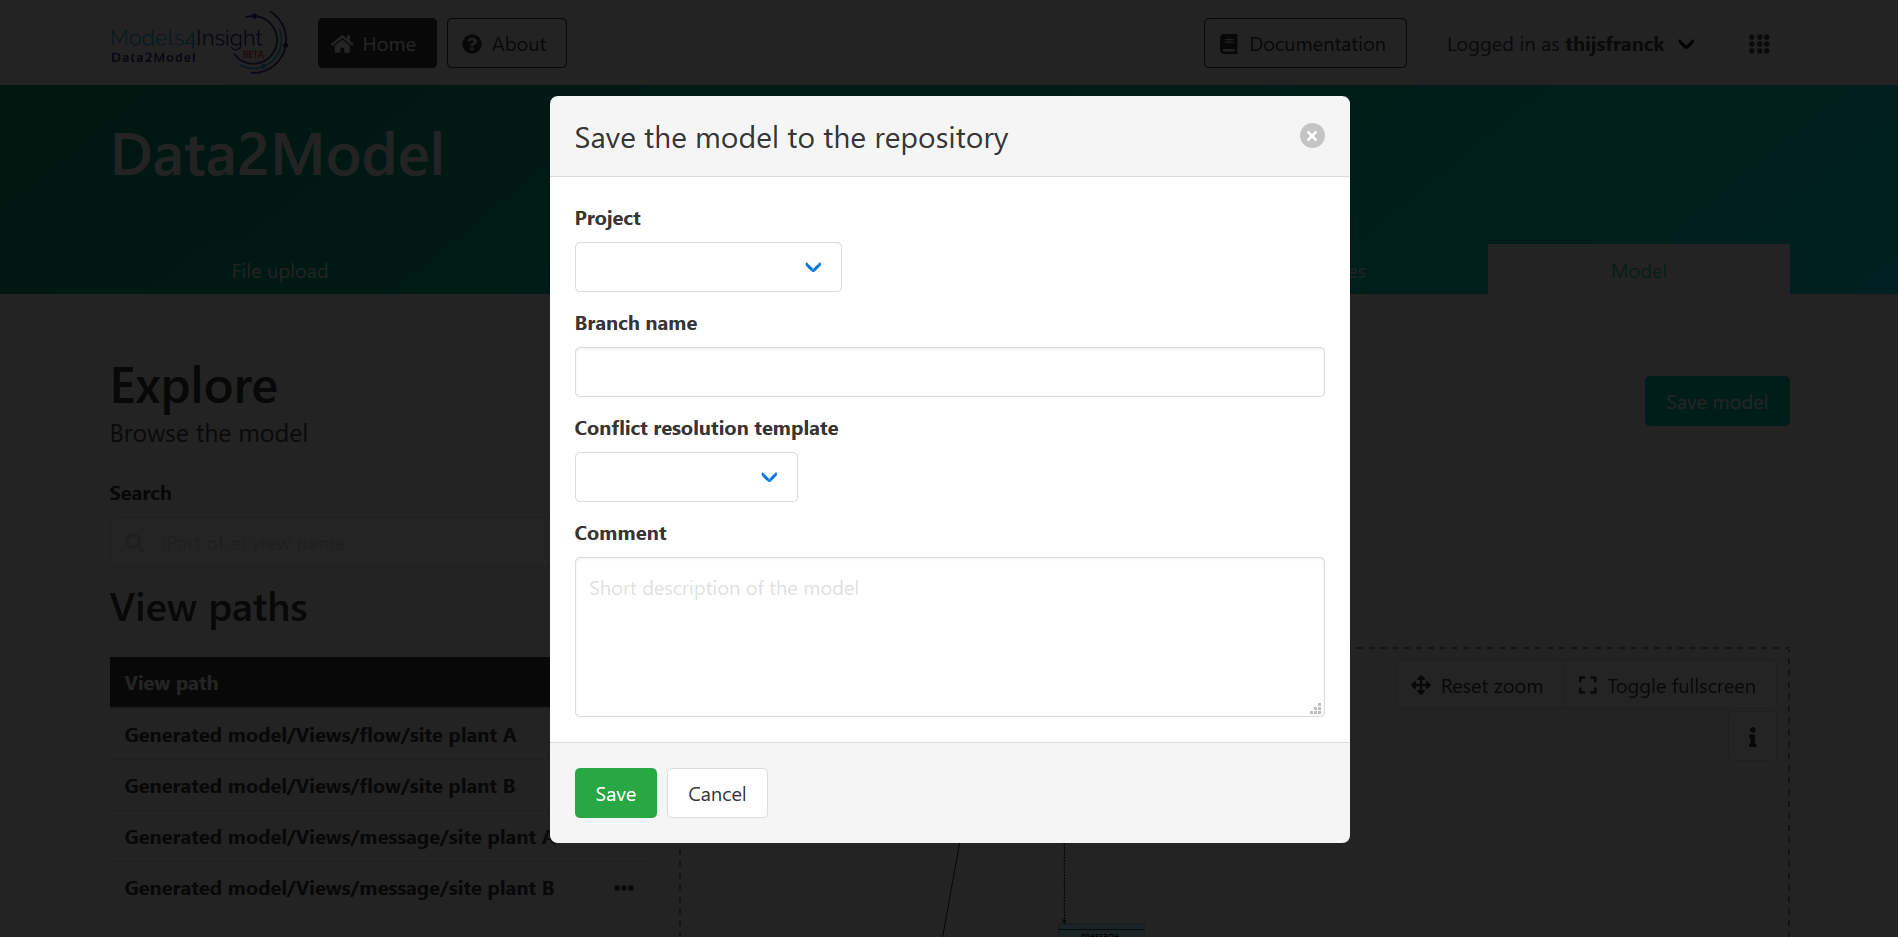
To commit the model to the repository, hit the ‘save model’ button at the top of the model explorer. A window will open which allows you to specify the project to which the model should belong. Once you have selected a project, the available branches will automatically be loaded. Please select either an existing branch from the dropdown menu, or enter a new branch name to create a new branch for the model. Next, please select a conflict resolution template which will be applied in case of a conflict with the previous version of the model. At the moment, it is not possible to resolve these conflicts manually.
| Template | Description |
|---|---|
| Keep repository | De facto nothing changes |
| Replace repository | Replace the repository head with the new model or source branch |
| Union keep repository | In case of conflicts, keep repository changes |
| Union replace repository | In case of conflicts, replace the repository with the new model or source branch |
Finally, please enter a description of the extracted model.
When you are done, please hit the ‘Save’ button at the bottom of the window to save the model to the repository. A progress bar will be shown to indicate the status of the commit.
Alter the rules
If you are not satisfied with the extracted model, you can go back to the rules overview to edit your rules. The extracted model remains available for reference.
I have extracted a model, what’s next?
After committing a model to the repository, it becomes part of your project. It is then accessible via the Models4Insight platform. Typical use cases from this point on include downloading the model for manual edits, or merging the extracted model with an existing model to assemble a complete architecture of your organization.